 How to make simple pillow covers without spending all of your time measuring and pinning. I used about 1.5 yards of fabric and two pillow forms from IKEA. (I will link to something similar at the end.)
  I start by leaving the fabric folded in half. I cut my yard and a half in half. You can do this horizontally or vertically. However you cut it, fold it in half again so that the "right sides" are together. That means the side of the fabric that should be facing out when the pillow is made should be touching. I usually iron this cease to make sure it stays well and that there are no big wrinkles.
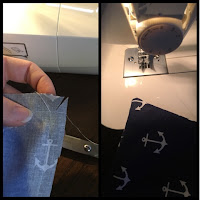
 This is where I cut out a few steps of measuring and pinning. Using the straight crease that I ironed into the fabric, I line up the fold with the edge of the foot on my sewing machine. As I run the fabric through the machine, I keep this fold in line with the edge of the foot giving me a straight stitched line and consistent seam allowance.
  Once this side is sewn, I do the same one of the adjacent sides. I used the anchor in the pattern to make sure that following the cut edge of the fabric kept me stitching a straight line at 90* to the first stitched edge. I also see beyond the corner to help reinforce the corner. This is what your first corner should look like.
  I then put the pillow inside the corner that is sewn and determine where I need to sew the third side. Thankfully, again the anchors helped me keep a straight seam, but here is an illustration that should help.
1. Sew the first 2 seams
2. Place the pillow inside the sewn corners and determine how where your third seam should be.
3. Fold the fabric diagonally so the seams are touching and make sure both seams are marked where the new seams to make a square should be.
4. Utilize the pattern of the fabric to keep a straight line, mark the seam line or pin it so that your third seam will be straight. Do the same with the fourth side, but be sure to leave an opening to flip the cover and insert the pillow form.
Before you flip the pillow cover right side our, be sure to snip the corner without cutting either seam. This will allow you to have much sharper corners once you flip the pillow cover.
The last step is to insert the pillow form and sew the remaining hole.
1-2. I find it easiest to roll the pillow and then gently push it in through the hole. It will naturally unroll once it is inside.
3. Push the pillow in far enough to fold the seam allowance inside and make sure the seam is straight between the two sewn sections at the bottom of the pillow. Pin it in place.
4. Push the pillow out of the way and put the pinned seam under the foot of your sewing machine. Once the foot is in place, it will help keep the pillow form pushed back so you can see the final portion of the seam.
*This last step can be done by hand if you are not comfortable sewing with the pillow form inside.
The finished product!


No comments:
Post a Comment