Monday, February 27, 2017

Easter Wreath

I LOVE Easter. What is there not to love? It is a celebration of Jesus death and resurrection in order that we might be able to receive salvation, to be counted righteous based on his perfect life and sacrificial death and resurrection. To celebrate the beauty of grace at the same time we are emerging from winter into spring is a beautiful, beautiful thing! So, in anticipation, my daughter and I worked on putting together or Easter wreath. She helped me design it and pick what would go where and I did the cutting, hot glueing and wire tying. ;) 

We started with a grapevine wreath that j made several years ago when we took down an overgrown grapevine plant at our old house. As we cut down the vines, my mom and I were able to craft 4 wreathed while the vines were still pliable. This is the first time I have used one of them. We also had to prep the sprays of berries. I clipped each individual stem off of the bunch with these pliers with a wire cutter. I used these to cut down the sticks attached to the Easter egg picks. 
Next, I tied the white, glitter tulle strategically to help reinforce the wreath. We laid out where each cluster and egg would like the best. Keep in mind that odd numbers are more pleasing to the eye. 
Once we decided where everything would go it was time to attach it all. The berry stems had wire in them, so I started by wrapping the stems around papers of the vine. 
I also used hot glue to more securely attach the stems to the wreath. With the eggs, I put hot glue at the base of the egg and along the stick so that it would connect with the vines once inserted. I also added more hot glue to the ends that stuck out the back before doing a final trim of the sticks. 
Some of the stems needed a little more reinforcement, so I used some green floral wire to wrap around the stems and vines and more securely.
And this....


...is the final product! 


Simple Throw Pillow DIY

How to make simple pillow covers without spending all of your time measuring and pinning.                                                                                                                                                                                                   I used about 1.5 yards of fabric and two pillow forms from IKEA. (I will link to something similar at the end.) 

I start by leaving the fabric folded in half. I cut my yard and a half in half. You can do this horizontally or vertically. However you cut it, fold it in half again so that the "right sides" are together. That means the side of the fabric that should be facing out when the pillow is made should be touching. I usually iron this cease to make sure it stays well and that there are no big wrinkles.
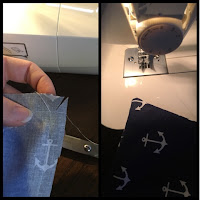
This is where I cut out a few steps of measuring and pinning. Using the straight crease that I ironed into the fabric, I line up the fold with the edge of the foot on my sewing machine. As I run the fabric through the machine, I keep this fold in line with the edge of the foot giving me a straight stitched line and consistent seam allowance. 

Once this side is sewn, I do the same one of the adjacent sides. I used the anchor in the pattern to make sure that following the cut edge of the fabric kept me stitching a straight line at 90* to the first stitched edge. I also see beyond the corner to help reinforce the corner. This is what your first corner should look like. 

I then put the pillow inside the corner that is sewn and determine where I need to sew the third side. Thankfully, again the anchors helped me keep a straight seam, but here is an illustration that should help. 
  
1. Sew the first 2 seams
2. Place the pillow inside the sewn corners and determine how where your third seam should be.
3. Fold the fabric diagonally so the seams are touching and make sure both seams are marked where the new seams to make a square should be. 
4. Utilize the pattern of the fabric to keep a straight line, mark the seam line or pin it so that your third seam will be straight. Do the same with the fourth side, but be sure to leave an opening to flip the cover and insert the pillow form. 


Before you flip the pillow cover right side our, be sure to snip the corner without cutting either seam. This will allow you to have much sharper corners once you flip the pillow cover. 


The last step is to insert the pillow form and sew the remaining hole.


1-2. I find it easiest to roll the pillow and then gently push it in through the hole. It will naturally unroll once it is inside. 
3. Push the pillow in far enough to fold the seam allowance inside and make sure the seam is straight between the two sewn sections at the bottom of the pillow. Pin it in place.
4. Push the pillow out of the way and put the pinned seam under the foot of your sewing machine. Once the foot is in place, it will help keep the pillow form pushed back so you can see the final portion of the seam. 
*This last step can be done by hand if you are not comfortable sewing with the pillow form inside. 

The finished product! 
My husband's grandpa made this table. We absolutely love it and I love that these pillows will help bring together the nautical theme in our family room


  • Sewing machine: http://amzn.to/2l4BTn7 This is similar to the style of Brother sewing machine I have. For a craft hobbyist, this is a great choice. It has great reviews and enough options to be versatile, but all the extras you don't need. 
  • 12x12 Pillow Forms: http://amzn.to/2m2SG9P
  • 18x18 Pillow Form: http://amzn.to/2lMuTdB
  • Anchor fabric (similar to what I used) but be sure to check JoAnn's for coupons and sales. http://amzn.to/2m2EoWG

Saturday, February 25, 2017

Must Have Bible Study Tools!

Here is a round up of my favorites! 

This is a list of the resources that I utilize as well as links to quality study bibles and a few of my other favorite tools. 

NASB Life Application Study Bible - http://amzn.to/2mhDfv8
ESV Study Bible - http://amzn.to/2momECs
HCS Bible - http://amzn.to/2mooRhm
Bible Study http://amzn.to/2lUMyR8
Micron Pens (no bleed through on Bible pages) - http://amzn.to/2mwdtiU

Resources: 
Biblegateway.com - This is where I copy and paste into Word from so that I can change the format for in depth study. 

Blueletterbible.org and Bible.org - Fantastic resources for study. 

The Charles Simeon Trust is the training seminar that many teachers from my church have attended and have brought back with them the concepts and techniques and taught them to many of us that cannot attend the conferences in person. There are audio, video and written resources on the website. 

http://www.desiringgod.org/labs - This is John Piper's resource where he walks you through a verse or two, phrase by phrase and sometimes word by word to help you learn how to understand a verse without having to go to commentaries right away.

I will be continuing with a series of posts, hopefully at least every other week on Bible study tools and techniques. 


Thursday, February 23, 2017

Crock Pot Balsamic Pork

This is a family favorite in my house! 
Serve it with your favorite steamed veggies and rice or quinoa OR serve it taco style with corn tortillas! YUM!

Ingredients: 
- 2 pounds boneless pork shoulder roast (sirloin roast)*
- Sea salt & black pepper to taste
- 1/2 tsp garlic powder
- 1/3 cup chicken broth, vegetable broth or water
- 1/3 cup balsamic vinegar
- 1 tablespoon honey
- 2-3 garlic cloves
- Optional - 1/2 tsp red pepper flakes
Directions:
  1. Season pork with salt, garlic powder and red pepper flakes (if desired) and place into the slow cooker.
  2.  Cut small slices into roast and push garlic cloves into the meat.
  3. Mix together the broth (or water) and vinegar and pour over the pork.
  4.  Drizzle honey over the top of the pork.
  5. Cook 4 hours on high or 6-8 hours on low
  6. Once the pork is cooked and tender, remove from the slow cooker with tongs and into a serving dish. It should shred easily. Pour juice over top for delicious flavor.

*Same dish can be made with chicken. 

Farsighted Kiddos

In October we began to notice that one of our son's eyes was drifting more and more often into the center corner of his eye. At his sister's 5 year check up at the beginning of November, their doctor noticed and recommended we see a pediatric ophthalmologist as soon as possible.

It was the beginning of an on-going journey. It took a while for us to get an appointment set up for our son because there are not many pediatric ophthalmologists. We made two appointments. The first with a doctor that could get him in quickly and the second with a specialist at the University of Michigan Kellogg Eye Center. All of our kids' specialists have been through Mott (U of M), so this was our preference, but it would take 2 months longer in order to get in to see this doctor.

Our first appointment was in early December with a very nice, but very near retirement doctor. He was able to diagnose our son as significantly far sighted and gave us a Rx for glasses. He really didn't give us much more info than that. We headed to the eye glass store and were able to find some glasses. We found the cutest pair of kid's glasses that they could adjust to fit our little guy's big noggin. 😋 The problem occurred when the doctor's prescription was so ancient that they couldn't understand it. It took several calls to get the updated version of the prescription. At that point, we decided to have the follow up appointment with the U of M pediatric ophthalmologist instead and I am so glad we did!

For 2 months we struggled to get our little guy to wear his glasses. We didn't know if he would need bifocals, patching or it was just a struggle because he is so young. Thankfully, all of our questions and the ones we didn't even know to ask were answered by the new doctor. She is AMAZING! His prescription was right, but kids that are farsighted have a much bigger and harder adjustment to glasses than those that are nearsighted. When you are nearsighted, glasses immediately improve your vision. When you are farsighted, your eyes have worked so hard to compensate, that it takes time for the muscles to relax and allow the glasses to actually work. The doctor also recognized that at barely 2, this concept was more than we could expect to be able to explain to our son. To assist with the transition to glasses, she gave us drops that we used 1 drop, 1 time. It dilated his eyes, essentially forcing the eyes to relax allowing him to experience the vision improvement almost immediately upon putting on his glasses. Within the week that the drops lasted, he completely acclimate to his glasses and now loves wearing them.


**On a side note, we also learned that modern pediatric ophthalmology requires a specific residency, but it used to be that ophthalmologists could do a little work with pediatrics and call themselves a pediatric ophthalmologist. Our first doc actually specialized in cataract surgery, but was willing to take pediatric patients. 

Diaper Dilema

What do you do when you have a just-turned-two-year-old that is NOT ready to potty train, but regular diapers are too small? 

We have had to transition to Pull-Ups in the 4T-5T size. The problem is that making it through the night without having to wash sheets because of leaks was rapidly becoming a distant memory. Not that there is anything wrong with Pull-Ups, but this kid at night? So we needed a new solution. They were the ONLY thing that fit him!

Enter diaper booster pads. 

When it comes to bedtime or long car rides, these are a mom's best friend. Even if your little one is in regular diapers, if you are planning a trip, pick up a pack of these from Amazon! 

You may be wondering how do they work? 

Here's a picture of the actual booster.
I usually fold it in half and slide it in the front of the Pull-Up for my son seeing as that is the part of the Pull-Up that is most essential for my little boy. 😉

If you have been having diaper troubles, I hope this helps!!